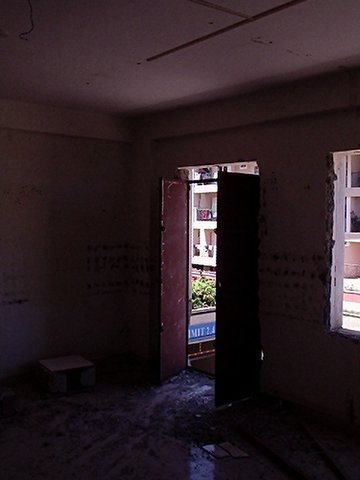
Fixed the tandoor and the rear access door yesterday. I didn’t carry my cam yesterday to the site and hence have no pix to post – which is a shame actually. Many people would be curious on how it is done… well I shall list the sequence on how to fix a tandoor here shortly. I did take a few pix of the tandoor this morning which is posted below.
As for the other civil works we have begun fixing the wall tiles and the plumbing work has also commenced in the kitchen. The interiors for the restaurant also started today. Have also confirmed the hiring of the Genset with Prasad and signed the agreement to this effect today, which should be erected in the next 10 days hopefully. The genset for us has been the best deal so far…yeah, well we have had a few great deals done…but the genset tops them all.
Tandoor: It was Wednesday 31 May that we, The chef and I went to pick the tandoor… Potters town as it is called is located a little distance from cantonment station and Mosque road. You will find many potters displaying their wares here.
We needed two pots for our restaurant and had decided on a large girth and a medium sized one. We had visited potters town on instruction form a colleague / friend of mine who works at the Windsor Manor. Spotted a nondescript house on the large alley showcasing a whole lot of wares…Pots of all shapes and sizes. We did a look about at the shops in the area to have a feel of what they had their tandoor pots priced at. Most shops had the clay ovens priced in the range from Rs 900 – 1500 per pot depending on the size.
We then moved to the shop we had the address for and our eyes fell on some very well displayed pots… we wanted 2 pots of size 2′ 5″ in girth and another for 2′. The color and the shape were of particular importance and we found the ones we were looking for. Those that we picked were burnt to a nice reddish brown tint and it didn’t have and chipped ends or corners.
Negotiated with the owners for a flat fee to transport and install the same at site. Initially we had planned to pick up an extra tandoor just in case one of them gets damaged in transit. By negotiating for a total installation package we saved ourselves the burden of transporting the pots ourselves and then finding someone to install the same.
Tandoor installation requires a level of expertise and the contents used to pack the same while building the oven depends on the clay used to make the pots and the demand / usage.
Our dimensions are
Length – 70 ”
Breadth – 36″
Height – 37″
Procedure for fixing
Its a brick and mortar job. Each standard sized mud brick is of the size 3″ X 4″ X 9″.
Steps.
- Lay the base 36″ X 70″ with brick and cement
- Pack the base with cement to form a stable platform with uniform sized bricks.
- Raise the base platform to 2 brick level height.
- Rough plaster the entire area
- Carefully place the tandoor pots on top of the platform
- Leave a gap of at least 8″ ( two brick width from the side) while placing the pot.
- Ensure that there is a slight forward tilt to the tandoor pot. This is for ease of operation while baking breads
- The backs of the pots may be raised using broken tiles or other broken bricks. Make sure you give only a slight tilt to the front.
- The side walls with one brick width are raise uniformly on all the four sides
- The space thus formed between the tandoor pot and the wall should be packed with packing materials
- There would be very little space to the front of the tandoor this is because of the slight tilt to the front. This is ok.
- Corse river sand is poured into the space between and then packed lightly using a thick wooden stump or any suitable material.
- Care to be taken as this can damage the tandoor if done carelessly.
- On top of the sand one layer of broken glass pieces are poured
- Sand is poured again and leveled followed by another layer of broken glass pieces.
- Dried brown mud is then put over this followed by another layer of glass sand and mud
- The top is then rough plastered leaving the mouth of the tandoor exposed.
- The base on the inside of the pot, which is actually open to the ground is plastered with cement. this is to ensure that any glass pieces that may have fallen inside gets covered and plastered by cement.
- The tandoor is then rough plastered on all sides
- This is left for a day or two with proper curing done once or twice every day.
- It is advised that this job is left to specialists to finish.
This is the rear door fixed yesterday and the partially finished tandoor

You will learn more on how to heat the tandoor initially when we do it shortly…
Technorati Tags : how+to+fix+a+tandoor


Manisha said
This is very cool! Just this past weekend, a friend of mine was saying that her husband wants to build an outdoor earthen grill. I immediately thought of tandoor. I would love to have one in my backyard someday!
Pradeep said
You get ready to use tandoors which are easier to install…one way is to get them preloaded into an empty oil ( or similar) drum. This way it remains modular.
All the very best…
raja said
what is the purpose of mixing pieces of broken glass with the sand while packing around the tandoor ?
Pradeep said
@Raja
Glass, clay and sand are used as a packing material on the sides while installing the tandoor and also glass acts as a very good insulator…which allows the tandoor to retain the heat within the clay pot when the coal is burnt.
sathyan said
hi,there are various versions of seasoning the tandoor,but could any one tell me the best way to season it,if come up with the way pls mail me….
with culinary regards
sathyan
Seasoning is done on slow fire a few times prior to the tandoor is heated to its full. This is done by rubbing the inside walls of the tandoor with a paste of spinach or any other green, leafy vegetable. After this has dried, a mixture of mustard oil, buttermilk, jaggery, and salt is applied over the paste. The tandoor is then heated by lighting a small fire at the base, so that the temperature rises gradually. If the temperature rises too fast, the internal walls will crack and it will not be possible to control the temperature. Once heated, the mixture will peel off, and it has to be reapplied three or four times to properly season the tandoor. Finally, the inside walls need to be sprinkled with brine and allowed to dry. Tradition recommends the use of cow dung cakes to start the fire before charcoal is used to fire the tandoor to its full capacity…
Rahul Bhalla said
Hi
I am looking for a vendor who can come and fix 3 new tandoors in my store. If anyone has any details for Bangalore city then please email it to me at rahul@capitalventures.co.in. thanks for the help